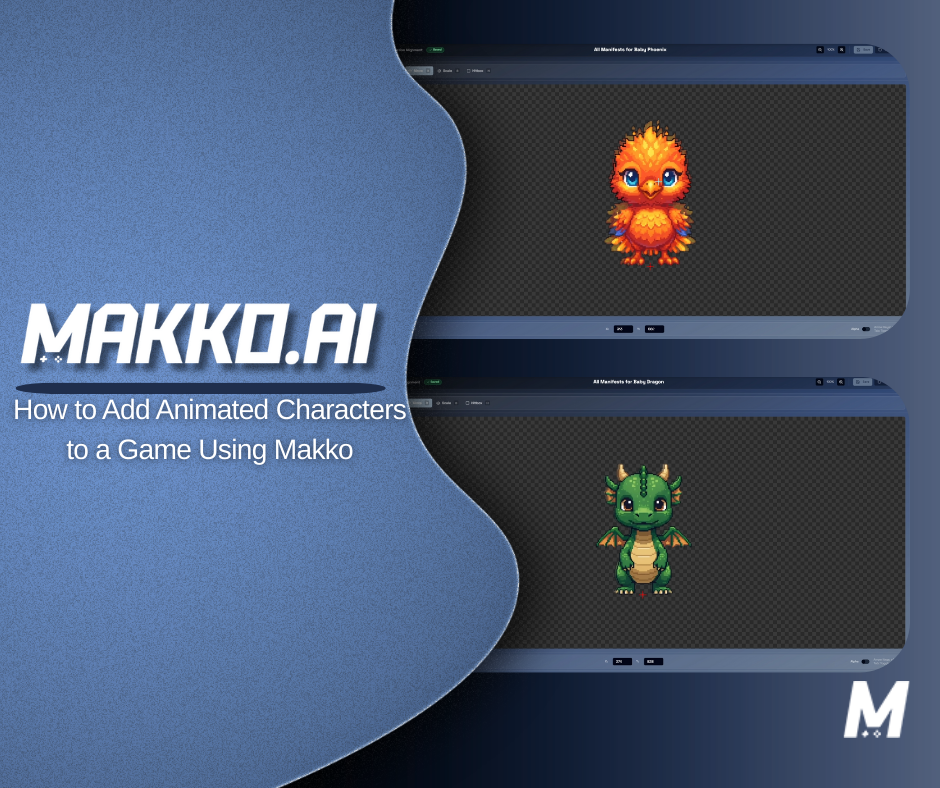
How to Add Animated Characters to a Game Using Makko
Walks through adding animated characters in Makko, from manifests and assets to animation states and testing.

Adding animated characters to a game is one of the most common friction points in early development. Creators generate a character they like, then discover that getting it moving and correctly rendered inside a game involves several steps that most tools leave you to figure out on your own.
Makko's Art Studio handles the full pipeline in one place: from character concept through animation generation, frame extraction, sprite sheet creation, and manifest building, before handing everything off to Code Studio where the character becomes playable in your game. Everything produced in this pipeline maintains consistent game art across every asset through Collections.
This guide walks through every step of that pipeline in order. By the end, your character will be animated, manifested, placed into the world, and ready to play. The whole process takes a few minutes once you know the sequence.
If you are new to how Makko handles AI character creation and sprite sheets, read that first. It explains the pipeline structure this guide builds on. For the full walkthrough in real time, the video below covers every step shown here.
Step 1: Create a Character in Art Studio
Open Art Studio from the Makko navigation bar. If you are starting fresh, create a Collection and name it after your game or project. Collections give the AI persistent context about your game's visual world, so every character generated inside one stays consistent with the same art style.
Inside your Collection, open the Characters sub-collection. Select your saved concept art as a reference before generating anything. This is the most important step for visual consistency: the AI uses the selected concept art to inform the style of your character. Skipping it is the most common reason a generated character does not match the established look of the game.
Write a character description. Be specific: silhouette, outfit, materials, color palette, and anything else that defines the visual direction. The Character Sprite preset auto-selects inside a Characters sub-collection, producing a transparent background, three-quarters full body view optimized for animation. Choose your art style, set resolution, and generate.
Evaluate the results. If one is close but not quite right, use the Iterate function: describe only what you want to change, and the AI applies just that change. When you are satisfied, click Save. Makko immediately prompts you to generate a Reference Sheet.
Generate the Reference Sheet. This produces three views of your saved character: front-facing, side-facing, and back-facing. The Reference Sheet is required before animation can begin. Without it, the AI does not have the multi-angle structural information needed to generate consistent frames across every action state. Review all three views. If any look inconsistent with the character sprite, regenerate before saving.
Name the character and save. The Character Details page is now the single source of truth for this character. All future animations, sprite sheets, and manifests live here.
Step 2: Generate Animations
From the Character Details page, navigate to the animation generation section. Name your animation clearly: walk, idle, attack, whatever the action is. Write a description of what you want the animation to look like. The description acts as your generation prompt, so be specific about the motion, the energy level, and any visual details that matter.
Review the animation preview before moving forward. If it is not right, adjust your description and regenerate.
Repeat this step for every animation your character needs. Each animation gets its own generation pass with its own name and description. Keep naming consistent across all animations for the same character. It matters when you build the manifest.
Step 3: Extract Frames
Once an animation is ready, move to frame extraction. Choose your frame rate: Retro at 8fps for a classic pixel art feel, Balanced at 12fps for standard game animation, or Smooth at maximum fps for highest fidelity. Set output scale to the highest quality and confirm the background color. Makko auto-detects the background color for transparency removal.
Click Extract the Frames. This produces a PNG sequence with transparent backgrounds. These frames are the raw material for the Animation Studio.
Open the Animation Studio to review and edit the extracted frames. Delete duplicate frames, remove frames where the motion stalls, and tighten the loop so it plays smoothly. Use Clone and Reverse to build a looping animation for idle cycles or run loops. Use Clone and Flip to mirror a sequence and create left/right directional animations without redrawing.
Clean frames at this stage mean a cleaner sprite sheet later. Do not skip the editing pass.
Step 4: Create a Sprite Sheet
Click Create a New Sprite Sheet. Choose a layout option: Automatic Grid lets the AI determine the optimal arrangement, Max Columns forces maximum columns across the sheet, and Single Row places all frames in one horizontal line. Configure frame padding (space between frames) and border offset (outer border around the entire sheet). Enable Power of Two Dimensions if your game engine requires it.
Makko generates an engine-ready sprite sheet from your extracted frames, exported as WEBP in a zip file. This is the file your game will read at runtime to render animation in response to player input and game logic.
Repeat the frame extraction and sprite sheet creation process for every animation you generated. Each animation becomes its own sprite sheet.
Step 5: Build a Character Manifest
A manifest bundles a character's animation sprite sheets for use in a specific game project. It is the bridge between Art Studio and Code Studio. One character can have multiple manifests, one per game, each with completely independent settings.
To create a manifest, enter the project name, the character name, and select which sprite sheets to include. Check only the animations that belong to this character. Click Create a Manifest.
Two rules to follow. First: include only animations that belong to this character. Mixing animations from multiple characters into a single manifest causes incorrect behavior in-game. Second: if you are adding multiple characters to your game, create a separate manifest for each one. Every character gets its own manifest.
Manifests are what Code Studio reads when integrating a character into your game. They are the structured definition of what that character is and what it can do.
Step 6: Add the Character to Your Project in Code Studio
Open Code Studio with the correct project open. Click the Asset Library icon in the side navigation panel. The library contains all assets from your Art Studio account: props, characters, backgrounds, and all character manifests. Filter to Character Manifests using the filter tabs at the top of the library.
Identify your manifest by character name and animation count. Click Add to Project. A "character added" notification appears in the bottom right. The same button handles both first-time additions and updates to existing manifests.
If you are adding multiple characters, add them one at a time. Adding characters individually allows the project to correctly register each asset.
Once your character is added, use Quick Actions to integrate it into the game. Click Quick Actions, choose Add a Character, select your character manifest, and submit the prompt. Makko's agentic AI handles the full setup: wiring the character's animations to the appropriate game states and making it playable without you having to configure the underlying logic manually. Repeat the Quick Actions step for every character you want to include.
Step 7: Rebuild and Test
Use the Rebuild Button at the top of the screen to recompile the entire game from scratch. Once the rebuild completes, launch the game and check that all characters appear correctly with their animations playing as expected.
If you see UI placeholders or unexpected images appearing in front of your animations, the game is likely still referencing generated placeholder assets instead of your external animations. This is a common issue at this stage.
Start a new chat with the AI and describe the issue clearly. Instruct it to hide animation UI placeholders for the affected characters, use only the externally added animations, and ignore any generated placeholder assets. After the AI applies the fix, rebuild again and retest.
If other issues appear, describe exactly what you are seeing versus what you expected. The more specific you are, the faster the fix.
Watch the Full Pipeline Walkthrough
The video below covers every step in this guide in real time: character creation, animation generation, frame extraction, sprite sheet creation, manifest building, and Code Studio integration. Follow along directly in your own project.
Why This Pipeline Works
The sequence matters. Each step in this pipeline produces an output that the next step depends on. The concept art becomes the reference sheet. The reference sheet informs the animation generation. The animations become extracted frames. The frames become a sprite sheet. The sprite sheets get bundled into a manifest. The manifest is what Code Studio reads to integrate the character into your game.
Skipping or rushing any step creates problems that show up later and are harder to fix than doing it correctly the first time. Inconsistent naming causes the AI to lose track of which assets belong where. Unclean frames produce sprite sheets with stutter or visual artifacts. A manifest that mixes animations from multiple characters causes incorrect behavior in-game.
The more consistent your naming and workflow across this pipeline, the faster every subsequent character becomes. The first character takes the most time because you are learning the sequence. By the third or fourth, the process is significantly quicker.
Makko's approach combines structured asset management with intent-driven game development. Instead of manually wiring animations to code, you define the character and its actions, and the system coordinates assets, logic, and game state from there. Adding or updating a character does not require touching the underlying code. It requires following the pipeline correctly and letting the AI handle integration.
Quick Reference: Full Pipeline Checklist
- Create Character — Open Art Studio, enter your Characters sub-collection, select concept art references, generate character using Character Sprite preset, iterate until satisfied, save, generate Reference Sheet (front/side/back), review, name and save character
- Generate Animations — From Character Details page, name each animation, write a specific description, generate and review the preview. Repeat for every animation needed.
- Extract Frames — Choose frame rate (Retro 8fps / Balanced 12fps / Smooth max fps), set output scale and background color, click Extract the Frames. Open Animation Studio, delete duplicate or unwanted frames, tighten the loop.
- Create Sprite Sheet — Click Create a New Sprite Sheet, choose layout option, configure frame padding and border offset, export. Repeat for every animation.
- Build Manifest — Enter project name, character name, select only this character's animations, click Create a Manifest. One manifest per character.
- Add to Project — Open Code Studio Asset Library, filter to Character Manifests, find your manifest, click Add to Project. Add characters one at a time.
- Quick Actions — Click Quick Actions, choose Add a Character, select your character manifest, submit the prompt. Repeat for each character.
- Rebuild and Test — Click Rebuild Button, launch the game, verify all characters appear and animate correctly. Fix any placeholder issues via AI chat and rebuild again.
Frequently Asked Questions
Why do I need a Reference Sheet before animating?
The Reference Sheet gives the AI three multi-angle views of your character: front-facing, side-facing, and back-facing. Without these, the AI does not have the structural information needed to keep proportions and silhouette consistent across every animation frame. Generating animations without a Reference Sheet produces frames that drift between poses, which breaks the sprite sheet and makes the character unusable in-game. Makko prompts you to generate it immediately after saving a character for exactly this reason.
Can I add more animations to a character after I have already built the manifest?
Yes. Generate the new animation, extract frames, create a new sprite sheet, then create an updated manifest that includes the new sprite sheet alongside the existing ones. When you click Add to Project in Code Studio for the updated manifest, the same button handles both first-time additions and updates. Rebuild after adding to apply the changes.
Why does each character need its own manifest?
A manifest is the definition of what a specific character is and what it can do. Mixing animations from multiple characters into one manifest means Code Studio cannot correctly associate each animation with the right character, which causes incorrect behavior in-game. One character, one manifest. If you want to use the same character across multiple games, you can create a separate manifest for each game, each with completely independent settings.
What do I do if my character appears as a UI placeholder instead of the animation after rebuilding?
This means the game is still referencing a generated placeholder asset instead of your external animation. Start a new AI chat and describe the issue: instruct the AI to hide animation UI placeholders for the affected character, use only the externally added animations, and ignore any generated placeholder assets. Rebuild after the fix is applied and retest.
Does the Rebuild Button do something different from the Play Button?
Yes. The Play Button in the preview window recompiles JavaScript and restarts the game. The Rebuild Button at the top of the screen recompiles the entire game from scratch. When adding a new character manifest, always use the Rebuild Button. The character will not appear in the preview until a full rebuild has been completed.
For more walkthroughs and live demos across all Makko features, visit the Makko YouTube channel.
Related Reading
- AI Character Creator vs Sprite Sheets: What's Actually Happening
- Art Studio Props Generator: A Pipeline Efficiency Guide
- How Agentic AI Chat Builds Game Logic
- State Awareness vs One-Shot Prompts: Why Your AI Game Logic Keeps Breaking
- How Prompt-Based Game Creation Works
- AI Game Generator From Text: How to Build Games Using Natural Language