I Turned My Notebook Sketch Into a Game-Ready Character Using an AI Character Creator
Turn a sketch into a game character with Makko's AI character creator. No art skills needed. Upload, describe, iterate, animate. Start free.

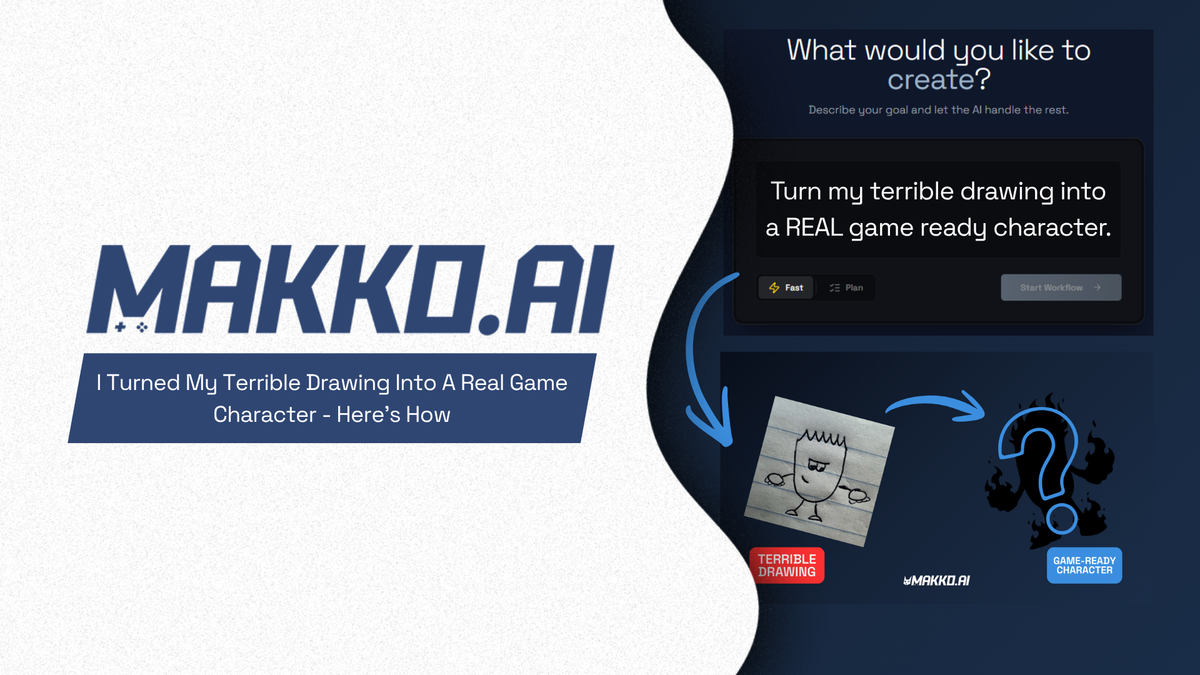
There is a fire guy I used to draw in the margins of my notebooks. Blocky body, little floating fists, flame on top of his head, a face that looks a little too confident for someone made entirely of fire. I drew him in math class. I drew him on the back of receipts. I always thought he would make a good game character.
He never became one, because I cannot draw at a level that produces game art. That sketch was the ceiling. Everything past it -- the color, the style, the animations, the consistency across a hundred frames -- required skills I did not have and time I was not willing to spend years acquiring.
This is the most common reason people never start making games. Not the coding. Not the game design. The art. Specifically, the gap between the character you can picture and the character you can actually produce.
This article is about closing that gap. The fire guy's name is Flamey. He is the first character in Elements: Tower Defense, a game being built episode by episode using Makko's Art Studio. Here is how a rough sketch on notebook paper became a walking, running, game-ready character, and what that workflow actually looks like from start to finish.
The drawing is not the art. It is the starting point.
This is the reframe that makes the whole workflow make sense. Most people assume that making a game character requires producing finished art: clean lines, correct proportions, a polished illustration. That assumption is what stops them before they start.
A sketch is not finished art. It is creative direction. It tells the AI what shape you want, what proportions you want, what personality you want. That information is more valuable than a technically perfect drawing, because the AI handles the execution. Your job is knowing what you want. The sketch is how you communicate it.
Flamey's sketch had the shape: blocky body, flame head, little fists, a face with too much confidence for its own good. It had no color, no style, no world. That was intentional, because the style comes from the Collection, not the sketch. More on that shortly.
Building the Collection first
Before generating anything, the first step is creating a Collection inside Art Studio. A Collection does two things: it organizes every asset for the project in one place, and it gives the AI persistent context about the game's visual world. Every character, background, and object generated inside the Collection draws from the same creative foundation. That is what keeps everything looking like it belongs in the same game.
The Collection for this project is named Elements: Tower Defense. Inside the Concept Art tab, the sketch of Flamey goes in as an uploaded reference. This does not cost any credits; it simply adds the image to the AI's context for this project. Alongside the sketch, style anchor images establish the visual direction: fire elemental concept art, chibi references, a warm color palette. The sketch gives shape and personality. The anchors give style and world. Together, they give the AI everything it needs.
This is the step most people skip, and it is the reason most people get inconsistent results. The Collections guide covers this in full, but the short version is: build the visual world before you generate anything important. Context first, generation second.
Generating Flamey from the sketch
With the Collection set up and the sketch saved as concept art, the next step is generating the character. The sketch is selected as a reference image. The style is set to Comic Book, which matches the chibi, bold-outline look established in the Collection's anchor images. Three images per generation gives enough options to choose from without generating more than needed.
The prompt describes what is not in the sketch: "Turn this sketch into a character made of fire. His hands and feet should have flames coming out of them. His face only has eyes and a mouth, and he looks like a cool guy." The AI reads both the sketch and the prompt, and generates from that combined input.
The first result was close: body, face, energy, all correct. One thing was off. The eyes were giving Flamey the wrong expression, more confused than confident. One iteration fixed it. The iterate tool takes a single description of what to change and applies only that change. "Make the eyes white." That was the entire instruction. The second result was Flamey.
This is worth naming clearly: the AI character generator workflow is not about getting a perfect result on the first try. It is about getting close on the first try and being specific about the one thing that needs to change. Most characters take one or two iterations. The skill is noticing what is not right and describing it precisely, which is a skill everyone already has.
Watch the full walkthrough
The video below shows the complete workflow from sketch to animated character: Collections setup, sketch upload, generation, iteration, Reference Sheet, and both walking and running animations baked into a finished sprite sheet.
The Reference Sheet: why it exists and why skipping it is a mistake
Once Flamey is saved, Art Studio immediately prompts the next step: generate a Reference Sheet. This is three views of the same character, front-facing, side-facing, and back-facing, generated from the approved character design.
The Reference Sheet exists because animation requires the AI to know what a character looks like from angles it has not yet seen. Without it, the system has to guess. That guessing produces drift: animation frames that look slightly different from each other, as if they were drawn by different artists at different times. With a Reference Sheet, every frame pulls from the same three-angle source, and the character stays consistent across every pose, action, and movement.
Flamey's Reference Sheet shows the flame silhouette reading clearly from the side, the back view staying consistent with the front, and the confidence in his face present from every angle. Frame one and frame forty-eight of any animation will look like the same character. That consistency is the difference between animation that feels right and animation that feels stitched together from separate pieces.
From Reference Sheet to walking and running animations
With the Reference Sheet confirmed, the next step is extracting animation frames. For Flamey's first two animations, the choices are walk and run: the two most fundamental movements for any game character. Each animation is described separately, covering what the motion looks like, the energy level, and any visual details that matter.
Frames extract at 12fps, the balanced setting that produces standard game animation without the overhead of maximum frame count. The PNG sequence comes out with transparent backgrounds, ready for a game engine. Both animations are visible in the Animation Studio, where individual frames can be reviewed, deleted, duplicated, or flipped before the sprite sheet is baked.
The sprite sheet bake handles everything: the grid layout, the format, the output. The finished sheet downloads as a zip file. The assets inside are real game assets, the same kind a professional artist would deliver, produced from a notebook sketch in an afternoon. For a deeper look at what happens between frame extraction and game-ready output, the sprite animation workflow guide covers the full discipline.
What the sketch-to-character pipeline actually proves
The gap between Cesar's notebook sketch and Flamey's finished walking and running animations is the entire argument for why the art barrier is no longer what it used to be. Not because AI makes everything easy: the workflow still requires decisions, iteration, and creative direction at every step. But because the skill required to make those decisions is one everyone already has: knowing what you want and being willing to describe it specifically until you get there.
Flamey looks the way he does because the person building him knew what kind of energy he wanted in the character's face. That is creative direction. It does not require an art degree. It requires having an opinion about your own idea, which is the one thing nobody else can have for you.
The broader shift in how games get made makes this possible. The tools have moved far enough that the question is no longer whether you have the skills to make this. It is whether you have the idea and the willingness to direct it. Most people with a game character in their notebook margin have both.
Episode 2 of Elements: Tower Defense drops Flamey into an actual game. For the full picture of how characters move from Art Studio into a playable game, see the guide on how to add animated characters to a game. And if you want to understand how Collections keeps every new character, background, and prop looking like it belongs in the same world as Flamey, the AI game art generator overview covers the full pipeline.
Frequently asked questions
Can you turn a hand-drawn sketch into a game character with AI?
Yes. Upload the sketch as a reference image inside a Makko Collection, describe what you want the character to look like, and the AI generates a game-ready version that matches what you drew. The sketch provides the shape and personality. The Collection provides the style and visual world. One or two iterations is usually enough to get the result right.
Do you need to be good at drawing to make game art with AI?
No. A rough sketch is creative direction, not finished art. It tells the AI what shape, proportions, and personality you want. That information is more valuable than a technically perfect drawing, because the AI handles the execution. The skill that matters is knowing what you want, not being able to draw it precisely.
What is a Reference Sheet and why do you need it before animating?
A Reference Sheet shows your character from the front, side, and back. You generate it once after approving your character design. Without it, animation frames drift because the AI has to guess what the character looks like from angles it has not seen. With a Reference Sheet, every animation frame stays consistent with the original character design.
How many iterations does it take to get a game character right with AI?
Usually one or two. The first generation is typically close. One specific description of what to change, describing only the thing that is not right, is almost always enough to get the result you keep. The iterate tool applies only the change you describe and leaves everything else alone.
How do you get multiple animations from one AI-generated character?
Generate the Reference Sheet once, then extract frames for each animation separately. Each extraction is independent: walking, running, attacking, idle. The same Reference Sheet is the source for all of them, so every animation stays visually consistent with the original character.
For detailed walkthroughs and live feature demos, visit the Makko YouTube channel.
Related Reading
- AI Character Generator for Games: How to Create Consistent 2D Characters With AI
- How to Use Makko AI Collections: Build Consistent Game Art With AI
- AI Game Art Generator: Characters, Backgrounds, Animations and Why Consistency Is the Hard Part
- Sprite Animation Workflow: Asset Hygiene, Anchor Points, and Getting Game Characters Right
- How to Add Animated Characters to a Game Using Makko